What is this?
This is a TinaCMS-enabled Next.js app, so you can edit your content on a live page. In this project the Tina file-based CMS is used via GraphQL: it's powered by a schema that you define. It not only serves content from Markdown files in your repository, but it also generates TinaCMS forms for you automatically ✨.
Scope
- Run this project locally using local content within this repository.
- Connect to Tina Cloud to benefit from its GraphQL Content API.
- Deploy the site to visually edit your site.
- Invite collaborators.
Requirements
- Git
- Yarn
Fork this repository
⚠️⚠️ Start by forking the repository and then pull it down to your computer. ⚠️⚠️
Install
ℹ️ This project usesyarnas a package manager, ifyarnisn't installed on your machine, open a terminal and runnpm install -g yarn
Install the project's dependencies:
yarn install⚠️ If you'd like to usenpmbeware that there is nopackage-lock.jsonso we can't guarantee the dependencies are the same for you.
Run the project locally
To run the local development server:
yarn devThis command starts the GraphQL server and the Next.js application in development mode. It also regenerates your schema types for TypeScript and GraphQL so changes to your .tina config are reflected immediately.
One of the most interesting aspects of the Tina Cloud Content API is that it doesn't actually require anything from the Cloud to work locally. Since Tina is by default a Git-backed CMS, everything can be run from your local filesystem via the CLI. :sunglasses:
This is ideal for development workflows and the API is identical to the one used in the cloud, so once you're ready to deploy your application you won't face any challenges there.
Open http://localhost:3000 in your browser to see your file-based content being loaded from the GraphQL API.
Edit content locally
We need to define some local environment variables in order to edit content with Tina.
Copy .env.example to .env:
cp .env.example .env
NEXT_PUBLIC_USE_LOCAL_CLIENT should be set to 1, other values can be ignored for now.
Restart your server and visit http://localhost:3000/, and click "enter edit mode" in the top right hand corner, the same page is displayed but you can notice a pencil icon at the bottom left corner.
Click to open Tina's sidebar which displays a form with fields you can edit and see update live on the page. Since we're working locally, saving results in changes to your local filesystem.
From here, you're ready to start building your own project, to read a little bit about how this project is structured, and how to modify it to make it your own, read the folder structure section below.
When you're ready to deploy your site, read on about how you can connect to Tina Cloud and make authenticated changes via our Cloud API.
NOTE: In this project there are two way to enter edit mode. You can click the "enter edit mode button" or visit/admin. You can also disable the edit button by settingNEXT_PUBLIC_SHOW_EDIT_BTN=0in.env
Connect to Tina Cloud
While the fully-local development workflow is the recommended way for developers to work, you'll obviously want other editors and collaborators to be able to make changes on a hosted website with authentication.
ℹ️ Changes in edit mode show up on your home page after your site finishes a rebuild.
Register your local application with Tina Cloud
- Visit auth.tina.io, create an organization, and sign in. Make a note of your organization name.
- Create a Tina Cloud app which connects to the GitHub repository you've just forked. Once your app is created, click on the app to get to the app settings and copy the client ID.
Connect your local project with Tina Cloud
In the env.local file set:
NEXT_PUBLIC_USE_LOCAL_CLIENTto0.NEXT_PUBLIC_ORGANIZATION_NAMEto your Tina Cloud organization nameNEXT_PUBLIC_TINA_CLIENT_IDto the Client ID displayed in your Tina Cloud App.NEXT_PUBLIC_SHOW_EDIT_BTNto0or1,0means there is no "enter edit mode" and you will have to visit/adminto enter edit mode.
Restart your server and run yarn dev again.
Open http://localhost:3000/ and click "enter edit mode"
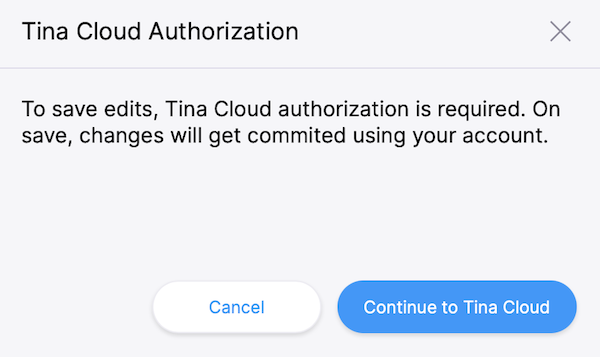
This time a modal asks you to authenticate through Tina Cloud. Upon success, your edits will be sent to the cloud server (and subsequently to GitHub).
Edit content
Make some edits through the sidebar and click save. Changes are saved in your GitHub repository.
Now that Tina Cloud editing is working correctly, we can deploy the site so that other team members can make edits too.
ℹ️ Gotcha: since your changes are being synced directly to Github, you'll notice that when your in non-"edit" mode your page still receive the unedited data from your local filesystem. This is mostly fine since editing with Tina Cloud is designed for hosted environments. But beware that changes to your schema may result in a mismatch between the Tina Cloud API and your local client.
Deploy
Vercel
Connect to your GitHub repository and set the same environment variables as the ones in your env.local file:
NEXT_PUBLIC_ORGANIZATION_NAME= <YOUR_ORGANIZATION>
NEXT_PUBLIC_TINA_CLIENT_ID= <YOUR_CLIENT_ID>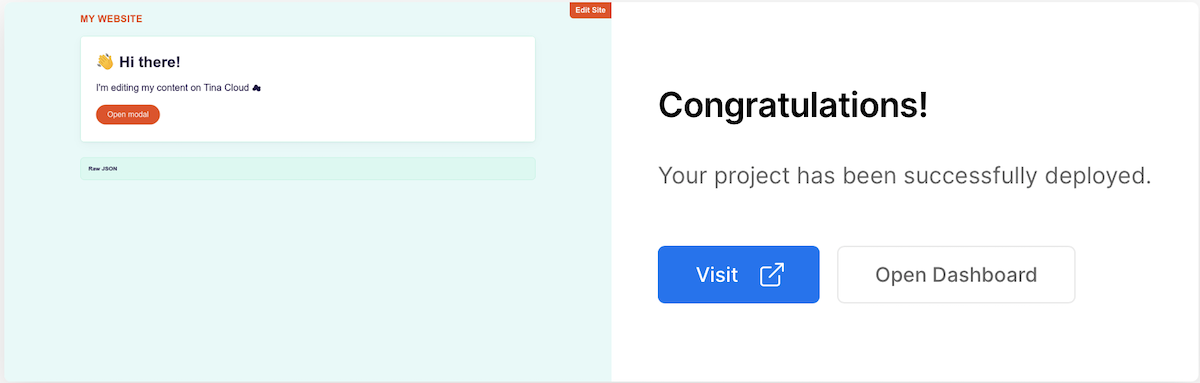
🎉 Congratulations, your site is now live!
You can test that everything is configured correctly by navigating to [your deployment URL]/, click "edit this site",
log in to Tina Cloud, and making some edits. Your changes should be saved to your GitHub repository.
Netlify

Connect to your GitHub repository, then:
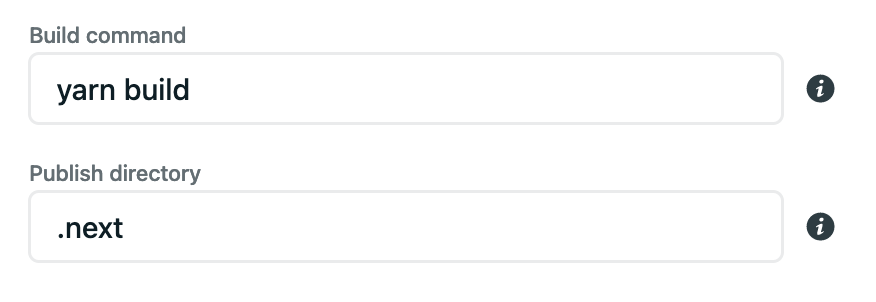
- set the build command to
yarn build, - set the publish directory. To
.next/.
Click on advanced to add the same environment variables as the ones in your env.local file:
NEXT_PUBLIC_ORGANIZATION_NAME= <YOUR_ORGANIZATION>
NEXT_PUBLIC_TINA_CLIENT_ID= <YOUR_CLIENT_ID>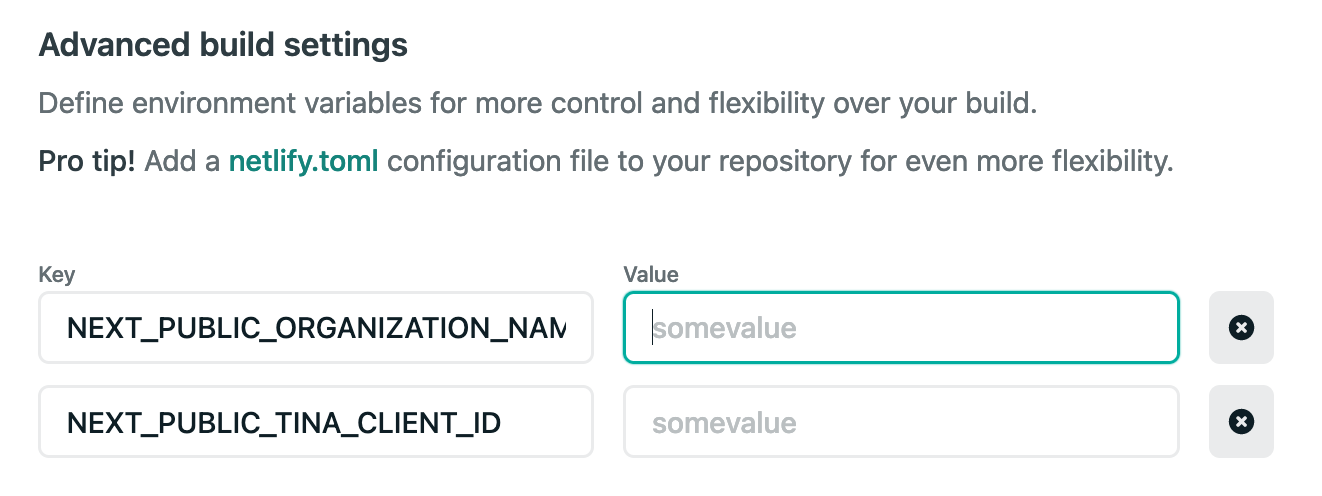
Copy-paste your Organization ID and Client ID.
Once you're done, click "Deploy site".
Install the "Next on Netlify" plugin in order to take advantage of server-side rendering and Next.js preview features.
Trigger a new deploy for changes to take effect.
You can test that everything is configured correctly by navigating to [your deployment URL]/, click "edit this site",
log in to Tina Cloud, and making some edits. Your changes should be saved to your GitHub repository.
Starter structure
Tina Cloud Starter is a Next.js application. The file-based routing happens through the pages directory. To edit this site, navigate to the /admin route. This will cause you to go into edit mode where Tina is loaded. Tina is only loaded in edit mode so it will not effect the production bundle size.
.tina/schema.ts
This is where your schema is defined, when you make changes here you'll notice that the generated GraphQL API changes too. It's a good idea to run your GraphQL server while editing so you can see any breakages.
Tip: Visit the GraphQL GUI at http://localhost:4001/altair so you can see how changes to the schema are updated in GraphQL.pages/[filename].tsx
This page can be seen at http://localhost:3000/, it loads the content from a markdown file which can be found in this repository at /content/pages/home.md. You can edit this page at by navigating to http://localhost:3000/admin.
Head over to the reference documentation to learn more about defining a schema or querying with GraphQL
pages/posts/[filename].tsx
The posts are stored in the content/posts directory of this repository, and their routes are built with getStaticPaths dynamically at build time.
The content folder
Here's where your actual content lives, you can control how content is stored from the defineSchema function, by default we use markdown.
components
Most of the components in this project are very basic and are for demonstration purposes, feel free to replace them with something of your own!
pages/_app.js
The _app.js file is a feature in Next.js that allows you to wrap all of your routes in some specific logic which will be applied to every page. We're using it to wrap your site content in TinaCMS context. We do this so when data passes through, we can hydrate it so that it's editable in real time. You may notice that it's being loaded dynamically based on something called EditState, when you're in edit mode we'll load TinaCMS and all that it provides. When you're not in edit mode Tina stays out of the way so your builds stay lean.
By default we've toggle the showEditButton to true. You'll likely want to remove that option as it'll show for visitors to your site.
pages/posts/[filename].tsx
The posts are stored in the content/posts directory of this repository, and their routes are built with getStaticPaths dynamically at build time. You'll notice a couple of helper functions like getStaticPropsForTina and staticRequest. These are helper functions to make sure you're returning data from the local GraphQL server in a shape that Tina understands. Feel free to bring your own http client if you'd like. Read more about these helpers in the Next.JS APIs documentation
Creating your own pages
For now, TinaCMS works best when you:
- Use
getStaticPropsfor data - Return data from
getStaticPropswithdata,query, andvariablesproperties. - Wrap your
_app.jsin TinaCMS dynamically.
After that, you're on your own. Go build something and share it with us on Twitter.
To browse the docs and query our GraphQL API, run yarn dev in your Tina project and go to http://localhost:4001/altair.
Getting Help
Tina Cloud is in public alpha, you might face issues, to provide feedback or get help with any challenges you may have:
- Read the Tina Cloud documentation.
- Visit the community forum to ask questions.
- Reach out to us on Twitter at @tina_cms.
- Email us to schedule a call with our team and share more about your context and what you're trying to achieve.
- Get support through the chat widget on the Tina Cloud Dashboard
LICENSE
Licensed under the Apache 2.0 license.